|
|
Post by La Mesa Stout on Feb 1, 2009 0:08:56 GMT -8
Well I've officially started. I've got one guy helping me and after 3 Saturdays of work we have it torn down to a rolling chassis. First goal is to get the frame out for sandblast and powder paint. No major problems so far. One of my rocker panels is 25% gone from rust. Had to grind off the bottom bolts on the fenders. Also someone had welded the right inner fender apron to the radiator core support frame, so had to cut that apart. Overall not really that bad for a 44 year old truck. Found out some really cool features along the way. The parking brake is a mini brake drum on the back of the transmission rather than cables going back to the rear drums. There is a access panel on the passenger floor to get easy access to the clutch slave cylinder. Makes for easy servicing. Also most fo the front end and cab floor bolts together rather than permanently welded. Not really a serive feature, but makes disassembly pretty quick and the pile of parts managable. 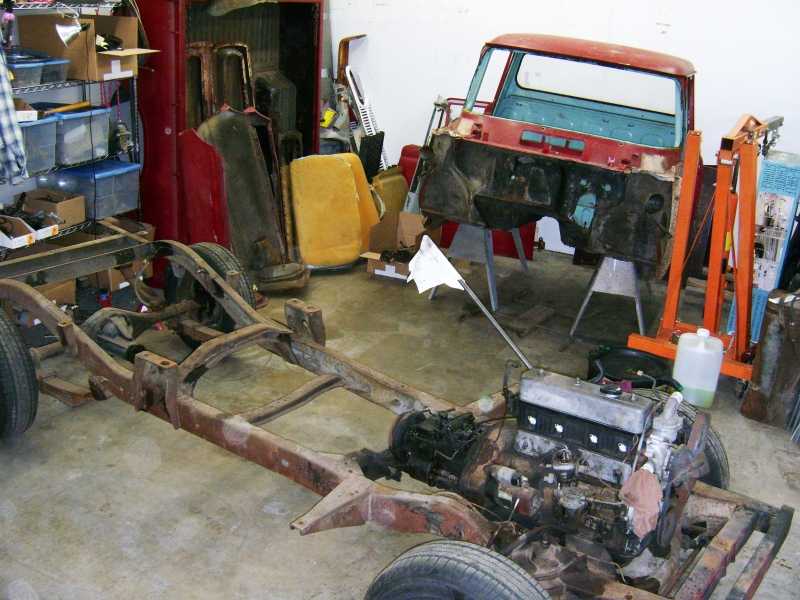 |
|
Oz_Stout
Toyota Enthusiast
 I Really Need Hubcaps For My Stout
Posts: 270
|
Post by Oz_Stout on Feb 4, 2009 22:53:32 GMT -8
I for one would like to see a lot of photo's in this thread as you go along. The hatch in the passenger floor is interesting. Gonna check and see if mine has one of those ;D
|
|
|
|
Post by toyotageek on Feb 10, 2009 12:16:23 GMT -8
Awesome! I agree with OZ - please show us more photos of this project. It's always more fun to SEE a project than just read about it!  |
|
|
|
Post by La Mesa Stout on Feb 14, 2009 17:46:04 GMT -8
Engine is out, front end is taken apart. Just need to disconnect the leaf springs and the chassis is ready to send out for sandblast and powder paint. 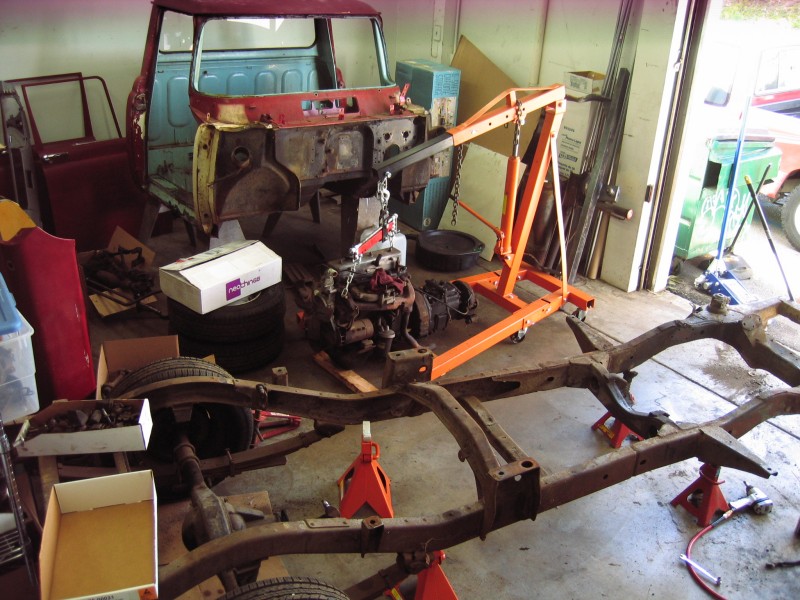 The cab is now over at my friends house, the master metal man. He will be doing the entire body through primer over there. Notice how neatly the cab fits into the bed of it's younger brother. 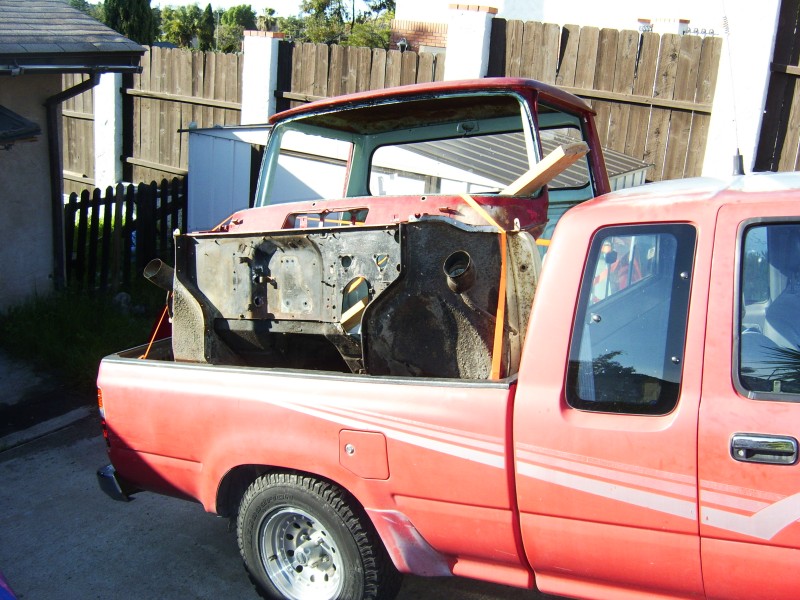 Sometime next week I need to get my blog better setup to handle pictures and posts of the project. Maybe I'll get a flickr account setup or something. |
|
|
|
Post by toyotageek on Feb 16, 2009 6:38:45 GMT -8
Cool! Love to see this stuff. What color do you plan on repainting the truck? Looks like it was blue, and repainted red at one time?
Let us know when you get your blog set up.
BTW - I use Flickr, and overall I'm happy with them. If you want to store lots of photos, you'll need a premium account. Only major drawback is they have no bulk download feature (so back-up your photos somewhere else, like disc or another hard drive). I also use Phobucket, which works easily with these Proboard forums.
|
|
|
|
Post by La Mesa Stout on Feb 17, 2009 18:26:35 GMT -8
Yea, speaking of color... How many have been restored, and what colors? Here is what I know:
Red with red grill, shown at SEMA (Toyota Museum)
Red with white grill, shown at JCCS before (Toyota Museum)
Light Blue (Cabe #1, sold)
Warm White (Cabe #2)
Personally I like the red the best, but it's been done twice. The Red one at JCCS was not a body off restoration, and they didn't even do the engine compartment, so I think it's not too hard to build the best red Stout around.
I'm not a fan of the blue.
The white is OK, but not really a headturner color.
I'd like to stay original, although I was already planning to paint the roof white like a landcruiser. So am I correct that I have a choice of three colors to be original? I might open it up to other toyota colors from that year. Maybe there is something more appealing from the car pallete.
|
|
|
|
Post by toyotageek on Feb 17, 2009 21:26:03 GMT -8
What color? That is the million dollar question! And if someone can find an answer to what the factory colors were for the Stout, I'll buy them a beer! I searched and haven't found anything! All the US literature from then has absolutely no info that I can find. About the only thing I can guess to say is: 1) they did not come with white roofs (although IMO they look better that way); 2) the front grille and bumper seem to have been painted white 3) they did NOT have rear bumpers I've seen some Japanese brochures on Yahoo Auction Japan, and have been tempted to buy them, but I have other priorities that come before Stout brochures...  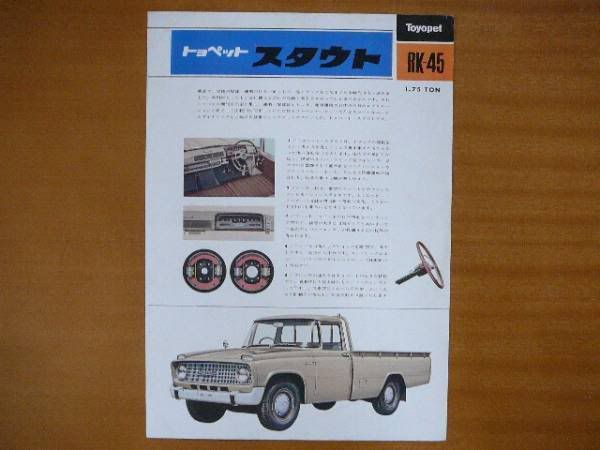 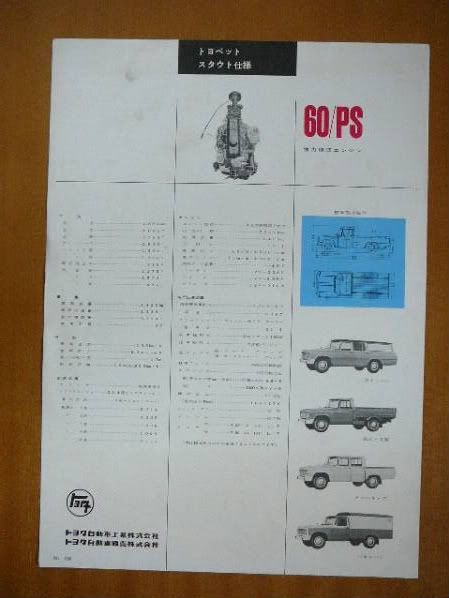    Anyway, back to the colors... The Coronas had a color code label in the engine compartment. I would think, but am probably wrong, that the Stouts should have a similar label. Otherwise, I've got a color chart from 66 - 70 that might be of some help. The best two Stout restorations I've seen were the two done by Mike B and Cabe Toyota. The red one from the Toyota museum sucks - too many things wrong with it.  The museum actually has a second Stout, and if I remember correctly it is white. |
|
|
|
Post by La Mesa Stout on Feb 17, 2009 21:29:19 GMT -8
I'm trying out Picasa as the photo album. It has a offline photo viewer/album maker/slideshow/etc, but more important it has a integrated 'upload to my web album' feature. So here goes:  This should be a 299px wide shot of the parking brake on the back of the tranny. Also there should be a link to the album in my signature. (edit1: well crap, neither worked. working on it!) (edit2: halfway there!) (edit3: OK, it works.. Ktksbye) |
|
|
|
Post by La Mesa Stout on Feb 17, 2009 21:51:49 GMT -8
This is the other red one I was talking about:  This was from SEMA 2006. Not sure if this is the same truck as the one they currently have. I suppose they could have later painted the bumper, wheels and grill white. I was under the impression they had two red Stouts. |
|
|
|
Post by Frenchy Dehoux on Feb 17, 2009 22:00:48 GMT -8
I do not like the red Stout that Toyota has in their museum. The engine compartment was not detailed like I would of done it. But the ivory colour Stout that they restored looks a lot better . Maybe I am to critical if they are to restore a vehicle they need to take the extra time and do it right.
Thanks
Frenchy
|
|
|
|
Post by toyotageek on Feb 17, 2009 22:18:51 GMT -8
Yea, speaking of color... How many have been restored, and what colors? Here is what I know: Red with red grill, shown at SEMA (Toyota Museum) Red with white grill, shown at JCCS before (Toyota Museum) Light Blue (Cabe #1, sold) Warm White (Cabe #2) I guess maybe I've been to the museum too many times and I haven't paid attention to what the red one looks like now... I have some old pics that show it with a white grille & bumper and some funky side mirror. The red one that was at last years JCCS... that was yours, wasn't it? It looks like the museum had their red one at JCCS 2007.... at that time it still had the white grille & bumper and ugly mirror. I do not like the red Stout that Toyota has in their museum. The engine compartment was not detailed like I would of done it. But the ivory colour Stout that they restored looks a lot better . Maybe I am to critical if they are to restore a vehicle they need to take the extra time and do it right. Thanks Frenchy I agree with Frenchy, the restoration that the museum has done on a lot of their cars have a lot to be desired. Unfortunately they seem to cut too many corners in their restoration efforts. Now the Toyopet Crown that was done up in Oregon and brought down here, THAT was done nicely! My friends are having their Tiara done by the same company. |
|
|
|
Post by La Mesa Stout on Feb 17, 2009 22:44:32 GMT -8
Yes, the red one at JCCS 2008 was mine. Toyota said theirs was in Texas at the time.
|
|
|
|
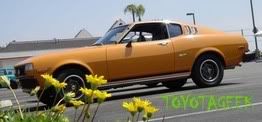
Post by La Mesa Stout on Feb 19, 2009 20:36:57 GMT -8
Would this be too crazy? I know there was an orange on early 70s Corollas and Celicas. I was out at lunch today and saw a new Dodge charger RT that looked pretty hot in orange. Whaddya think?  (this is actually the toyota museum red stout, with some color tweaking in paint shop pro) |
|
|
|
Post by toyotageek on Feb 19, 2009 21:20:28 GMT -8
It's not factory.... but, I kinda like it. ;D
|
|
|
|
Post by mnstout on Feb 20, 2009 20:43:08 GMT -8
I like it too, but I am also partial to Mopars. Petty blue might look sharp as well.
I also like the single headlight look of the illustration in the brochure, with the cross-hatch grill. (RK 45), was this just the artists rendition or did Toyota produce units like this?
|
|
jeshua
Toyota Novice
Posts: 32
|
Post by jeshua on Mar 5, 2009 9:53:43 GMT -8
Looking forward to following your restoration. Any progress since your last post?
|
|
|
|
Post by La Mesa Stout on Mar 6, 2009 11:52:43 GMT -8
More work has been done, but it gets less obvious in the pictures. Motor, tranny and rear end are out: 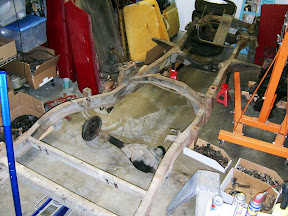 Pile of parts going to the powder coater with the frame:  Mike has started work on the door shells. One has some pretty bad problems on the bottom, so we will have a sheet metal fabricator produce couple pieces that he will section in:  Removed the axles and differential from the axle housing, which will be powder coated:  I may go to Harbor freight tis weekend to by a utility trailer, so I can get the frame and parts across town. Next week and weekend I'm out of town on business so there won't be much to show for a while. Higher rez pictures can be viewed in the album link in my sig. |
|
jeshua
Toyota Novice
Posts: 32
|
Post by jeshua on Mar 9, 2009 9:02:53 GMT -8
Who are you using for media blasting & powder coating?
Could you go into a little detail on how the steering wheel was removed?
|
|
|
|
Post by La Mesa Stout on Mar 11, 2009 21:09:47 GMT -8
The company I'm using is
Powder Pros Inc.
954 Industrial Pl.
El Cajon, CA 92020
619-401-9015
(close to Johnson and Main)
They have a huge 30ft oven, so they can handle anything.
To get the wheel off, you need to remove the center logo and trim. Push in, quarter twist to the left, and it falls out in your hand. There are a couple springs inside. Net you probably need a steering wheel puller. There are two threaded holes in the steering wheel hub, and the puller will screw in there and push on the center shaft. They're usually on there pretty good, so you'll need a $29 tool you'll use exactly once in your life. Try and borrow or rent one instead
|
|
jeshua
Toyota Novice
Posts: 32
|
Post by jeshua on Mar 12, 2009 10:37:17 GMT -8
Thanks for the contact info, and for the how to on the steering wheel. I didn't want to break the center part trying to take mine apart.  |
|
|
|
Post by La Mesa Stout on Mar 18, 2009 21:02:59 GMT -8
OK, we are officially in assembly mode now. Went back to powder pros today to pickup the chassis and the first batch of parts. Actually there are a lot of smaller assemblies to take apart and restore still. 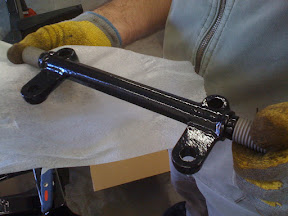  We took the frame, control arms, front spindles, and some other stuff I have yet to unwrap. The cab is still there but it's ready for me to take (they're only sandblasting selected areas - I'm not powder coating the body parts). Most of the running gear will be black, but I am breaking away from factory on the driveshats, rear axle housing, coils springs, and front sway bar. I picked a medium gray that matches the interior dash gray. Should look nice having some contrast below. Seven new photos here: picasaweb.google.com/mr.bill.paul/StoutReassembly# |
|
jeshua
Toyota Novice
Posts: 32
|
Post by jeshua on Mar 20, 2009 14:06:19 GMT -8
I'm really enjoying this. Its making me look forward to my project even more, can't wait till I get started on it. And your thread is a great help to me already seeing how things look and come apart. Keep up the great work and thank you for sharing it with us. Edit: Not sure if I'm to late with this, but I just reread the thread and noticed your posts on the color of the stout and what they originally were. From what I've found on-line it looks like there was 4 diffrent colors available. Horizontal Blue (T1208) - available 1966-1968 Honey Yellow (T1322) - available 1965-1968 Seminole Red (T332) - available 1964-1968 Lily White (T403) - available 1964-1968 Taken from www.toyotareference.com/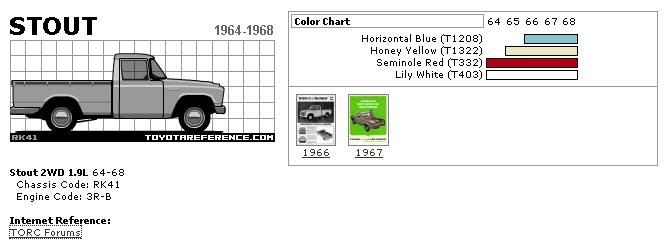 Would be nice to know how many of each color were produced each year. Number of Stouts imported into the US. 1964 - 4 1965 - 962 1966 - 1425 1967 - 1828 total - 4219 |
|
|
|
Post by toyotageek on Mar 21, 2009 19:16:22 GMT -8
OK, we are officially in assembly mode now. Went back to powder pros today to pickup the chassis and the first batch of parts. Actually there are a lot of smaller assemblies to take apart and restore still. We took the frame, control arms, front spindles, and some other stuff I have yet to unwrap. The cab is still there but it's ready for me to take (they're only sandblasting selected areas - I'm not powder coating the body parts). Most of the running gear will be black, but I am breaking away from factory on the driveshats, rear axle housing, coils springs, and front sway bar. I picked a medium gray that matches the interior dash gray. Should look nice having some contrast below. Seven new photos here: picasaweb.google.com/mr.bill.paul/StoutReassembly#NICE! Looks like you really plan on doing a thorough job! ;D |
|
|
|
Post by toyotageek on Mar 21, 2009 19:21:00 GMT -8
Not sure if I'm to late with this, but I just reread the thread and noticed your posts on the color of the stout and what they originally were. From what I've found on-line it looks like there was 4 diffrent colors available. Horizontal Blue (T1208) - available 1966-1968 Honey Yellow (T1322) - available 1965-1968 Seminole Red (T332) - available 1964-1968 Lily White (T403) - available 1964-1968 Taken from www.toyotareference.com/Would be nice to know how many of each color were produced each year. Number of Stouts imported into the US. 1964 - 4 1965 - 962 1966 - 1425 1967 - 1828 total - 4219 I helped Darren quite a bit with brochures when he was putting his site (Toyota Reference) together. He was trying to come up with the color codes for all the cars and trucks, but I wasn't aware he finally found some for the Stout. Recently I helped him with the color codes for the Crown from that era, and I think he might have made an educated 'guess-timate' as to the Stout colors, by matching the Stout colors with the Crown colors.  The import figures you quote are actually TOTAL SALES figures for the USA (excluding Hawaii). The numbers come from a Toyota Motor Sales database that I received several years ago. Unfortunately there are no records regarding the production numbers by color...  |
|
|
|
Post by La Mesa Stout on Apr 2, 2009 9:56:29 GMT -8
I'm excited now. I just ordered a zinc kit. www.caswellplating.comWith this I'll be able to restore nuts and bolts to a factory lookign yellow chromate zinc. They should look like this when done:  |
|
|
|
Post by Carlyn Dinkler on Apr 5, 2009 2:55:52 GMT -8
I would like to hear how the zinc home plating kit works.
Some notes on plating that I hope are helpful.
The following are some suggestion on plating, mainly zinc in yellow which is most of what we do for the old Coronas.
1. Disassemble & clean the parts in carburetor cleaner, or other, to degrease and remove anything that would contaminate the blasting media (you do not want grease balls in your blasting media).
2. Blast clean (we use Starblast XL or SP in a blasting cabinet)
3. Use a grinding wheel & file to 'square up' the heads.
4. Chase all threads, & if you have to use a die & it removes chunks, the bolt was probably stretched.
5. Blast again in a glass bead cabinet to have a brighter finish.
6. If you have a zinc plater that you can use, check on requirements such as the lot size that they will do, price, different processes they have (in yellow some processes will 'throw' better than other meaning they will plate better in 'deep' parts but the finish might not be as 'yellow'), ask how they want parts separated into lots for barrel plating or rack plating, etc.
7. If your lot has springs, you will need to have the lot baked to avoid hydrogen embrittlement. This may cost as much as the plating.
8. Normally we do 200# or more at a time and I do not make a good inventory of all the small parts in the lot, and I sometimes have the feeling that some parts I give them may still be at the bottom of some of their big tanks. So if a part is not replaceable, do it another way yourself. There are some old processes like Parkerizing in black or gray-green that you could try (I have not tried these).
9. Most platers can do yellow, white (bright), black, green, & other colors.
10. My zinc plater also can do electroless nickel (which throws well inside parts) and I have had a few rear ash trays done that where chromed (I think) and the results where much better than my chrome plater had done on some (chrome does not throw very well). The electroless nickel is also a good finish for carburetor shafts.
10. If you have parts to chrome plate that are thin steel like lamp bezels, or pot metal like door handles, and the plater tries to grind off the old finish or grind out 'pits', they will probably ruin your part. They need to be able to chemically strip the part, then do minimum grinding/polishing before plating. Ask them to try one part before giving them all your parts. I have lost some very good parts because they did just a little bit to much grinding/buffing.
I plan to be at TORC to talk to the old Corona people and maybe show a few new items.
Carlyn Dinkler, cdinkler@bellsouth.net
|
|
|
|
Post by La Mesa Stout on Apr 13, 2009 19:53:20 GMT -8
Well I've done a couple zinc sessions now, but clearly I'm still in the learning process. At this point I've discovered that this is going to be a one part at a time operation. I was hoping to run dozens of parts, but you have to hang each part and control it's position in the tanks relative to the Zinc anodes. I'm sure I'll get better and be able to manage a few parts at a time.  I've only done a few washers and bolts, and the big one today was a u-bolt. Anything bigger and I'll need a bigger power supply. I calculated this was going to require 3.5 amps, but my power supply could only do 3.15 and it seems OK, but I can't say how deep it went. Also I've learned that it's all about surface prep. I could have got a better finish on the u-bolt, but this was wire wheel polished only. I may do it over.  Other than that, we've got the sandblast and paint setup nicely. I'm using regular play sand since it was Saturday when I bought it and I'm impatient. I did order from Grainger some self etching primer in a spray can, so that gray/green finish is not the final color when done. 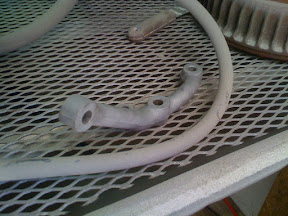  Question for the group - does anyone know how the license bracket attached? The bracket I have did not come with this truck. The only pictures I can find form Toyota show it directly under the left tail light, but I can't tell how or where it attached, to the frame or to the bed. If anyone has one in a stock location I would appreciate a snapshot.  |
|
|
|
Post by mnstout on Apr 14, 2009 18:34:02 GMT -8
|
|
|
|
Post by La Mesa Stout on Apr 14, 2009 18:46:01 GMT -8
Ah, OK. That explains a lot. Thanks.
Mine had a homemade bumper that went inside the frame box, so they must have ditched the plate frame back then.
That is the same plate frame I have (got form a parts truck last year), so I guessing it's the real deal.
BTW, I got the ashtray - thanks!
|
|
|
|
Post by La Mesa Stout on Nov 2, 2009 20:25:30 GMT -8
Minor update. Things are starting to come together, however slow:  This is just trial assembly here, note the missing spring. We've been trying to get the front end together, but every weekend we realize we need to restore/paint/buy just one more little part. It's starting to happen though. Many other things happening in parallel. Completely disassembled the starter, generator, steering box. Looking for gasket paper so I can trace and make new on the laser machine. Finding many differences between RH drive and LH drive versions, gotta read that parts book carefully. Getting better at yellow zinc. It's really a matter of consistency of the process, and keeping the tanks clean of contaminants: 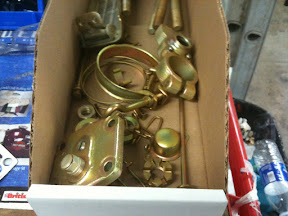 |
|


 The museum actually has a second Stout, and if I remember correctly it is white.